Monday, October 13, 2014

SSIS - How to Perform Union Operation in SSIS Package

Scenario:

We have two text files and we want to perform Union operation ( only get distinct records from both files) and load to our Destination. When we look in Data Flow Items, we don't see any Transformation that's name is Union. So how would we do this in SSIS?


Solution 1 ( Use Sort Transformation)

In this post we will first use Union All Transformation to union all records. Union All Transformation is going to return us all records, if they are present multiple times, Union All Transformation is going to return us multiple records. Then we will use Sort Transformation to eliminate duplicates and keep only one copy of them. Let's start with step by step approach

Step 1:

Create two text files as shown below. As you can see I have one record ( Aamir,Shahzad,XYZ Address) that is present in both files, rest of records are unique.
Fig 1: Text files for Union Operation in SSIS Package


Step 2:

Create new SSIS Package. Inside the SSIS Package, Bring the Data Flow Task to Control Flow Pane. Inside Data Flow Task, Bring Two Flat File Sources and create connection to TestFile1 and TestFile2.

Bring the Union All Transformation in Data Flow Pane and Connect the Both Flat File Source to it. As my column names in Testfile1 and TestFile2 are same, It will automatically map them. If your columns names are different , double click on Union All Transformation and map the columns from sources.
Fig 2: Union All Transformation in SSIS to merge Data from Two Sources

As Union All is going to return us all records , even duplicates. We want to get only distinct records as Union operation. Let's bring Sort Transformation and configure as shown below
Fig 3: Use Sort Transformation To Remove Duplicate Records

Now we can write these records to destination table or file. In my case just to show you, It worked, I am going to put Multicast Transformation and then add Data Viewer between Sort and Multicast Transformation to show you we performed Union Operation by using Union All and Sort Transformation together. If you want to learn more about Data Viewer, you can check this post.

Fig 4: Performing Union Operation in SSIS Package by using Union All and Sort Together


As we can see in Fig 4, two records are read from each source. Union All Transformation returned us 4 records( Aamir,Shahzad,XYZ) as duplicate record. We used Sort Transformation to eliminate duplicates so we can get output Union would have return us. Sort removed the duplicate copies and returned us three records.

Solution 2 ( Use Aggregate Transformation)

We can use Aggregate Transformation with Union All Transformation to perform Union Operation in SSIS as well.
Instead of using Sort, let's put Aggregate Transformation after Union All Transformation and configure as shown below
Fig 5: Perform Union Operation in SSIS By using Aggregate Transformation


Let's run our SSIS Package and see if this package is performing the Union should.
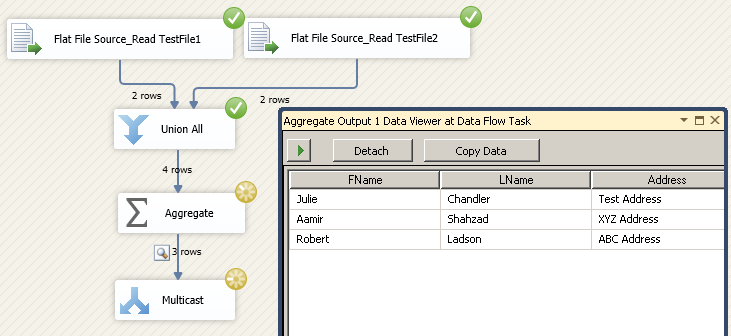
Fig 6: Performing Union Operation By Using Union All and Aggregate Transformation Together

If you have small number of records and enough memory on machine where you are running the SSIS Package, this can be quick solution. If you have large number of records , These package can take long time to run. As Sort and Aggregate Transformation are blocking transformations. If you have large number of records, You might want to inserted them into database tables and then perform Union operation.

SSIS - How to Delete Top N Rows from CSV or Text File in SSIS by using Script Task

Scenario:

We have received text or csv file. The file has some company information,date created etc. before the data rows start. Our goal is to delete these information rows and regenerate file start from header row.
Fig: Source File With Company Information

Solution:

We will be using Script Task to Delete the Top N rows from text file. We will be reading all the data from the file in string type array and then overwrite the original file after removing Top N rows.

Step 1: 

Create two variables as shown in figure.
VarFilePath is variable holding the file path. VarDeleteTopNRows is variable that will hold the number of rows you want to delete from starting of file.
Fig 1: Create variables in SSIS Package To Delete Top N Rows from Flat File by using Script Task

Step 2:

Bring the Script Task to Control Flow Pane. Map the above Variables as shown to ReadOnlyVariables in Script Task.
Fig 2: Map Variables in Script Task

Paste the below Code. I have bold the code that I wrote, rest of the code is auto generated by Script Task.

#region Namespaces
using System;
using System.Data;
using Microsoft.SqlServer.Dts.Runtime;
using System.Windows.Forms;
using System.IO;
using System.Linq;

#endregion

namespace ST_c62f3dcfb0964917aade179aac4edfab
{
   
    [Microsoft.SqlServer.Dts.Tasks.ScriptTask.SSISScriptTaskEntryPointAttribute]
    public partial class ScriptMain : Microsoft.SqlServer.Dts.Tasks.ScriptTask.VSTARTScriptObjectModelBase
    {
       
        public void Main()
        {
            // TODO: Add your code here
        string FilePath = Dts.Variables["User::VarFilePath"].Value.ToString();
        Int32 DeleteTopNRows = Convert.ToInt32(Dts.Variables["VarDeleteTopNRows"].Value); 
            string[] lines = System.IO.File.ReadAllLines(FilePath);
            lines = lines.Skip(DeleteTopNRows).ToArray();
            System.IO.StreamWriter file = new System.IO.StreamWriter(FilePath);

            foreach (string line in lines)
            {
            //    MessageBox.Show(line.ToString());
            file.WriteLine(line);
            }

            file.Close();
            Dts.TaskResult = (int)ScriptResults.Success;
        }

     
        enum ScriptResults
        {
            Success = Microsoft.SqlServer.Dts.Runtime.DTSExecResult.Success,
            Failure = Microsoft.SqlServer.Dts.Runtime.DTSExecResult.Failure
        };
        

    }
}


Save the code. Run the script task and once completed. Check the file again.
Fig 3: Top 3 Rows Deleted By SSIS Package.

You can change the value of variable VarDeleteTopNRows according to your requirements. 

SSIS - How To Delete Bottom N Rows From Flat File in SSIS Package

Scenario:

In our previous post, we learnt how to delete Top N rows from flat file by using SSIS. In this post we will learn how to delete Bottom or Last N rows from text file in SSIS by using Script task. In below fig we can see that there are four rows those are company information and file information. We want to delete these rows before use this file as source to load into destination.
fig 1: Source file with extra information that need to deleted.


Solution:

We will be using Script Task in SSIS Package to delete bottom N rows from text file. Here are the steps.

Step 1:

Create SSIS Package and inside SSIS Package create two variables. One to hold  source file path and other to hold the rows to be deleted from bottom.
Fig 2: Create variables in Delete Bottom N Rows SSIS Package

Step 2:

Bring the Script Task to Control Flow Pane and then map the variables as shown in fig 3.
Fig 3: Map the variables in Script Task for Delete Last N Rows from Flat File

Click on Edit Script button and then paste the below script. I have bold the script that I wrote. You can copy and paste only bold code to your Script Task.

#region Namespaces
using System;
using System.Data;
using Microsoft.SqlServer.Dts.Runtime;
using System.Windows.Forms;
using System.IO;
using System.Linq;


#endregion

namespace ST_c62f3dcfb0964917aade179aac4edfab
{
   
    [Microsoft.SqlServer.Dts.Tasks.ScriptTask.SSISScriptTaskEntryPointAttribute]
    public partial class ScriptMain : Microsoft.SqlServer.Dts.Tasks.ScriptTask.VSTARTScriptObjectModelBase
    {
       
        public void Main()
        {
            // TODO: Add your code here
    string FilePath = Dts.Variables["User::VarFilePath"].Value.ToString();
    Int32 DeleteBottomNRows = Convert.ToInt32(Dts.Variables["VarDeleteBottomNRows"].Value); 
            string[] lines = System.IO.File.ReadAllLines(FilePath);
            
           Array.Reverse(lines);
           lines= lines.Skip(DeleteBottomNRows).ToArray();
           Array.Reverse(lines);

            System.IO.StreamWriter file = new System.IO.StreamWriter(FilePath);

            foreach (string line in lines)
            {
            // MessageBox.Show(line.ToString());
            file.WriteLine(line);
            }

            file.Close();
            Dts.TaskResult = (int)ScriptResults.Success;
        }

     
        enum ScriptResults
        {
            Success = Microsoft.SqlServer.Dts.Runtime.DTSExecResult.Success,
            Failure = Microsoft.SqlServer.Dts.Runtime.DTSExecResult.Failure
        };
        

    }
}


Let's run our SSIS Package now and check the file if required rows are deleted from bottom.

Fig 4:Bottom N Rows are deleted from Flat File by using SSIS Package.

As we can see that the required rows are deleted from source file. We are reading the file in string array and then deleting the required rows and over writing the actual source file. The number of rows can be changed by using the value of VarDeleteBottomNRows variable.

SSIS - How To Use Flat File Or Excel File In Lookup Transformation [Cache Transformation]

Scenario: 

We use Lookup Transformation to join input data with reference data to get required data from Reference Data. By using Lookup Transformation we can connect to databases and get the reference data. But our company has An Excel file that they want to use as reference. The business users can add or remove the records from this Excel. Before we load any data to our destination table we need to verify against this Excel sheet if data matches on required columns.


Solution:  

Once solution to this problem can be, Create the Staging Table and then truncate on each load and load from Flat file and then use in lookup transformation for reference.

In SSIS 2008, Cache Transformation was introduction so we don't have to load the data into Staging/Temp tables to use in Lookup Transformation. We can load the data in memory by using Cache Transformation and then use in Lookup Transformation.

Let's say if I have a source table as shown below
Fig 1: Source Data for Cache Transformation Example

As we can see that I don't have the CountryName. I need to get the CountryName from Flat file by joining the input and reference data on Country Code.


Fig 2: Flat File Reference Data for Cache Transformation


Step 1: 

Create an SSIS Package. Inside SSIS Package bring the Data Flow Task. In this Data Flow Task we will load the Data from Flat File to Cache Transformation. Bring the Flat source and create connection manager for flat file and then bring the Cache Transformation and configure as shown below.
Fig 3: Create Configure Cache Transformation in SSIS Package

Fig 4: Configure Index Position for Mapping Columns in Cache Transformation.

As we are going to use CountryCode for joining with out input column. Set the Index position for this column to 1. If you are using more than one column for joining , you can change the Index position. For first column, It will be 1 and then for second 2 and so on. We don't need to Index the Column/s which we are not using in Join.

Fig 5: Load Reference Data To Cache by using Cache Transformation in First Data Flow Task

In Fig 5, we have loaded the reference data from Flat file source to Cache by using Cache Transformation in Data Flow Task.

Step 2: 

Bring the second Data Flow Task and connect with First Data Flow Task. Inside 2nd Data Flow Task, Read the data from SQL table by using OLE DB Source.Bring the Lookup Transformation and attach OLE DB source to it and configure as shown below.

Fig 6: Configure OLE DB Source


Double Click the Lookup Transformation and then in Connection Type choose Cache Connection Manager as shown below.

I Left Fail Component in How to handle rows with no matching entries. You can configure as per your requirement. You can redirect or fail if there are some record/s that does not match with reference dataset.
Fig 7: Use Cache Connection Manager in Lookup Transformation


Fig 8: Choose Cache Connection Manager in Lookup Transformation

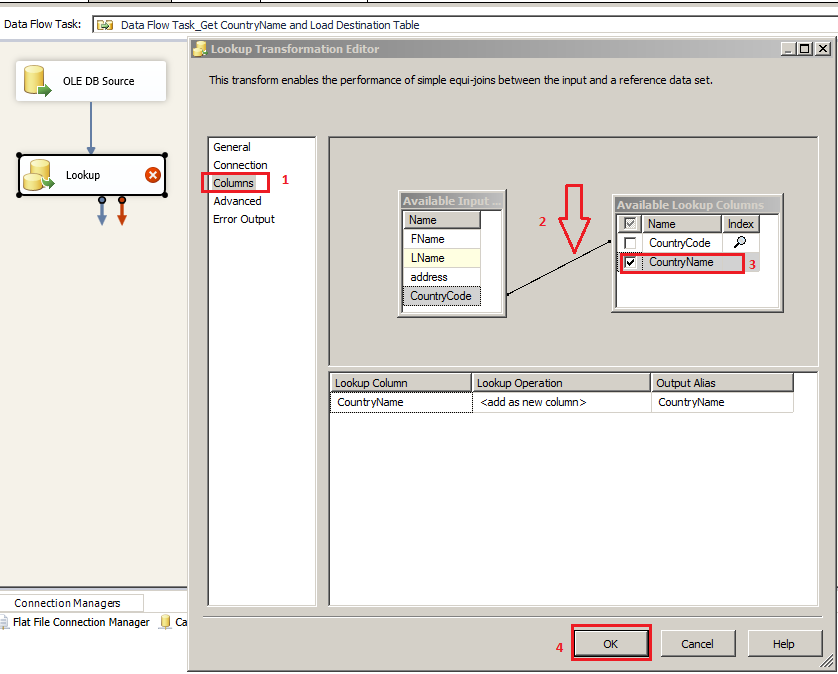
Go to Columns and then connect the columns on which do you want to join. I have connected CountryCode column from Source to CountryCode in Reference Dataset. By using the Check Boxes, Select the columns those you want to retrieve from reference dataset. In our case we want to retrieve Country Name and finally hit Ok. 
Fig 9: Map the Columns from Source to Reference Data Set


Add the destination and then map the columns. Just to show the output, I have used Multicast Transformation as Test Destination and added data viewer to show the records. 

Fig 10: Output from Lookup Transformation


Our final package will look like below fig.
Fig 1: How to Use Cache Transformation in SSIS Package

SSIS - How to Find The Version Of SSIS Package From Dtsx File

Scenario: 

Let's say you just start working for a company and they pointed you to a folder which holds SSIS Packages. You need to find out the version of these SSIS Package and schedule them to SQL Server 2008 or SQL Server 2012 according to their version.

Solution:

To find out the version our SSIS Package , we need to read the .dtsx file itself. We can open the file by using different programs such as internet explorer or notepad or word pad etc. The .dtsx files are xml files and the property we need to look for is "PackageFormatVersion".

For SSIS 2008
PackageFormatVersion="PackageFormatVersion">3


For SSIS 2012 
PackageFormatVersion="PackageFormatVersion">6

Fig 1: SSIS Package with different versions

As you can see that I have two SSIS Packages but can't tell either they are SSIS 2008 or SSIS 2012.

Right Click on the Package.dtsx and go to Open With. You can choose the program you want to use for this. I opened it with Notepad.

Once the file is opened. You have to look for PackageFormatVersion. You can use Ctrl+F ( Find) and then find it. 

Fig 2: Find Version of SSIS Package from dtsx file

As PackageFormatVersion=6, This package was developed in SSIS 2012.


Let's check the package1.dtsx by using the same method.
Fig 3: Read SSIS Package file (dtsx) to find out version

As PackageFormatVersion=3, The version of this SSIS Package is 2008/2008 R2.

SSIS - How to Disable/Enable Task/s In SSIS Package

Scenario:

One of our SSIS Package failed in Production today. By looking at the log information we got to know that the one of the Data Flow Task failed. We want to debug this package in Development environment but Package has other Tasks in it. How Can I only run the failed Data Flow Task?

Solution:

In SSIS Package you can disable the Tasks. Any Task or Container that you place in Control Flow Pane can be disabled and you can leave the Task or Tasks enable which one you want to run. This feature is very helpful while debugging package without deleting the Tasks.  Once you are done with debugging , you can enable the Tasks.

Tasks/Containers can be disabled. You can not go inside the Data Flow Task and disable a transformation or more than one Transformations.

Fig 1: SSIS Package with Different Tasks

Let's say we want to debug above SSIS Package but we don't want to execute Foreach Loop Container and "Data Flow Task_Load data Into Staging Tables" Data Flow Task. 

We can simply Right Click on any of the Tasks/Containers and then click Disable.That will do the magic for us and disable the script.

Fig 2: How To Disable Task/Container with Tasks in SSIS Package


Fig 3: Disable/Enable Tasks/Containers in SSIS Package

If you execute SSIS Package, the disabled Tasks will not run. To enable Task/ Container, Right Click on it and click Enable.
Fig 4: Enable Disabled Tasks in SSIS Package

SSIS - How To Create Folder with Date in SSIS Package

Scenario:

We load data from different type of files on daily basis. We want to archive files after load. To manage processed files by date, we need to create a folder with Date every day and move the files to it once processed.

Solution:

We will be creating the Folder with Date if not exists. We will be using File System Task and expressions to achieve this.

Step 1:

Create your new SSIS Package and then create three variables as shown below.
Fig 1: Create Variables for Archive Folder

I created the variables so you can change the value of these according to the environments in which your package is going to run by using SSIS Configuration.

VarFolderPath: It is path to the main folder where we want to create Archive Folder.
VarFolderName : This will hold the value of folder name that we want to create.
VarFolderFullPath: This will combine Folder path, folder name and date added to the end. We will write expression on this variable as shown below.

Step 2: 

Select VarFolderFullPath and then hit F4 to go to properties of variable.
Fig 2: Write Expression on Variable in SSIS Package

Set EvaluateAsExpression=True and then Click on the button right front of Expression. Under Expression , write the below expressions as shown below

@[User::VarFolderPath]+ @[User::VarFolderName]+"_"+REPLACE(SUBSTRING((DT_STR,50,1252)GETDATE(),1,10),"-","_")

Fig 3: Build Expression in SSIS Package for Folder with Date

Step 3: 

Bring File System Task to the Control Flow Pane and then configure as shown below.
Fig 4: Create Directory With Date By Using File System Task In SSIS Package

Let's run our SSIS Package and see if the directory is created in required folder.

Fig 5: Folder Created with Date by Using SSIS Package

Now you have the folder ready to move your processed files to it.